December 04, 2024, 12:49:55 AM
This section allows you to view all posts made by this member. Note that you can only see posts made in areas you currently have access to.
Pages1
2
Help Us Build the Database /
June 24, 2008, 02:04:35 AM
Yes, white tape would help. The problem would be getting it to match the background well enough so that you wouldn't have to be cloning out the tape from the background. Plus this whole thing is made to be folded up flat when not in use. If the tape were to get folded, it would be almost as if there were no tape there to begin with.
In fact if you notice the two sheets of white paper in the first photo, I originally had them taped to the back so it curved down over the seam in the back. When I looked through the viewfinder I saw 2 or 3 lines from shadows the paper was making. So after doing all of this shooting for the site, I'll keep my eye out for a large white sheet of bristol board to remedy this next time.
In fact if you notice the two sheets of white paper in the first photo, I originally had them taped to the back so it curved down over the seam in the back. When I looked through the viewfinder I saw 2 or 3 lines from shadows the paper was making. So after doing all of this shooting for the site, I'll keep my eye out for a large white sheet of bristol board to remedy this next time.
3
Help Us Build the Database / A photographic how-to.
June 23, 2008, 06:34:13 PM
I was asked if I could write a quick guideline on one of many ways to take photos of Transformers with that "Oh, so white" background.
So here goes.
First off, you'll need a background of some sort. I've made mine out of 3 sheets of foam core board. One each for the bottom and back, and one half for each side. You can use anything that's large, flat, smooth and white. Next you'll need lights. When I don't have access to my gear, I'll use desk lamps. One lamp has an adjustable neck, and the other has a clip on type base. Whatever you've got around to use, the principle is still the same. Take the smaller of the two lights and shine it just on the background by either shining it from one side or from over the back of your setup. The idea is that when you place the figure in the set you're not hitting it with the light from the first light (as much as possible). Bring your other light in just above and slightly to one side of your camera. Here's where some trial and error comes in. The idea is that you want your background light to be 2-4 times (1-2 f-stops) brighter than your other light so you'll have to play with the distance between the light by the camera and the subject. If you can get it so the subject is properly exposed and the background is close to pure white in the camera it'll save a lot time in Photoshop. If you're familiar with the histogram function of your camera look for a big spike in the graph on the right side. The closer it gets to the edge of the graph the whiter the background will be. If it's not pure white when you get it into Photoshop I'll adjust the highlights using the Levels dialog box.
Some general tips:
Use a tripod. I shot some of these photos with exposures as long as 8 seconds. It's the only way to make sure the camera stays still.
White Balance. If your camera has a custom white balance get out your manual and learn how to use it. This will save loads of time, you shouldn't have to colour correct at all on the computer.
Macro. Usually seen as a flower on one of the cameras buttons. Especially useful for shooting small mini-con sized items. Lets you get in and focus close than you otherwise normally would. Here filling the frame is not as important as proper focusing. You can always crop out unneeded background. Also setting the self-timer will eliminate any camera shake from when you press the shutter.
None of this is an exact science. The great thing about digital cameras is they allow you to try different ways to accomplish what you're after.
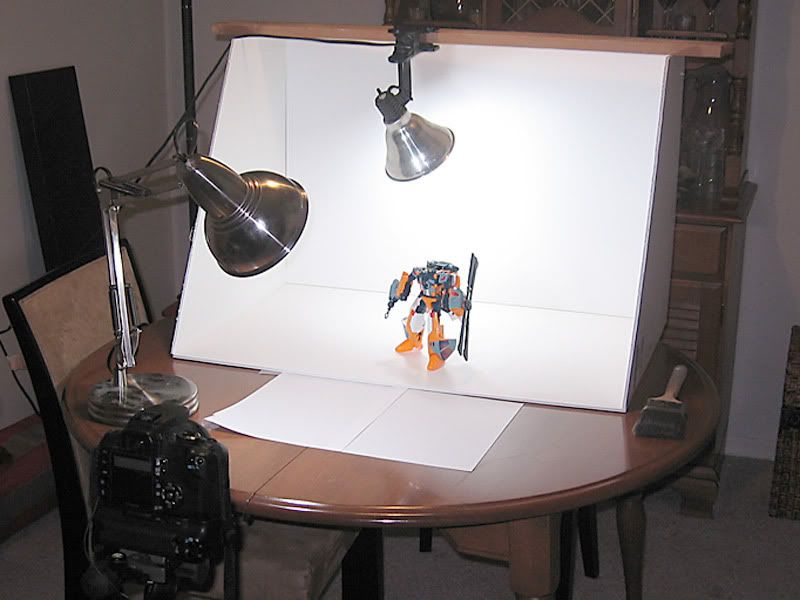
Here's a shot of my setup.
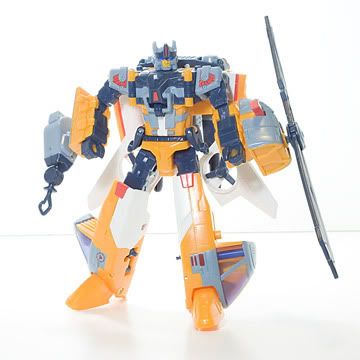
Here's the picture of Evac straight from the camera.
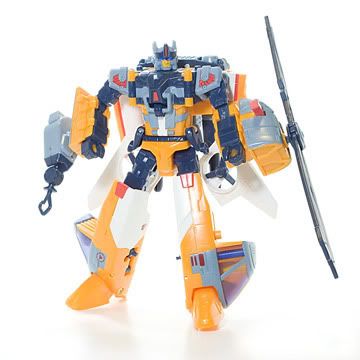
Here's the final picture after some Photoshop.
I lightened the background until most of the white was reading 255 on all RGB values.
I had to clone out the line in the back where the back wall met the bottom.
I also lightened the shadow in the bottom right corner.
So here goes.
First off, you'll need a background of some sort. I've made mine out of 3 sheets of foam core board. One each for the bottom and back, and one half for each side. You can use anything that's large, flat, smooth and white. Next you'll need lights. When I don't have access to my gear, I'll use desk lamps. One lamp has an adjustable neck, and the other has a clip on type base. Whatever you've got around to use, the principle is still the same. Take the smaller of the two lights and shine it just on the background by either shining it from one side or from over the back of your setup. The idea is that when you place the figure in the set you're not hitting it with the light from the first light (as much as possible). Bring your other light in just above and slightly to one side of your camera. Here's where some trial and error comes in. The idea is that you want your background light to be 2-4 times (1-2 f-stops) brighter than your other light so you'll have to play with the distance between the light by the camera and the subject. If you can get it so the subject is properly exposed and the background is close to pure white in the camera it'll save a lot time in Photoshop. If you're familiar with the histogram function of your camera look for a big spike in the graph on the right side. The closer it gets to the edge of the graph the whiter the background will be. If it's not pure white when you get it into Photoshop I'll adjust the highlights using the Levels dialog box.
Some general tips:
Use a tripod. I shot some of these photos with exposures as long as 8 seconds. It's the only way to make sure the camera stays still.
White Balance. If your camera has a custom white balance get out your manual and learn how to use it. This will save loads of time, you shouldn't have to colour correct at all on the computer.
Macro. Usually seen as a flower on one of the cameras buttons. Especially useful for shooting small mini-con sized items. Lets you get in and focus close than you otherwise normally would. Here filling the frame is not as important as proper focusing. You can always crop out unneeded background. Also setting the self-timer will eliminate any camera shake from when you press the shutter.
None of this is an exact science. The great thing about digital cameras is they allow you to try different ways to accomplish what you're after.

Here's a shot of my setup.

Here's the picture of Evac straight from the camera.

Here's the final picture after some Photoshop.
I lightened the background until most of the white was reading 255 on all RGB values.
I had to clone out the line in the back where the back wall met the bottom.
I also lightened the shadow in the bottom right corner.
Pages1
